Here is the tutorial I promised for Shadow box card.

Firstly you need a piece of card - 11 1/2 inches x 51/2 inches (19.2 cm x 14cm)

Firstly you need a piece of card - 11 1/2 inches x 51/2 inches (19.2 cm x 14cm)

Score at 51/2 inches and 6 inches (14 cm and 25.2cm)

Measuring 1 inch (2.5cm) from the edges and middle fold of the card draw a square, this should measure 31/2 inches (9cm)

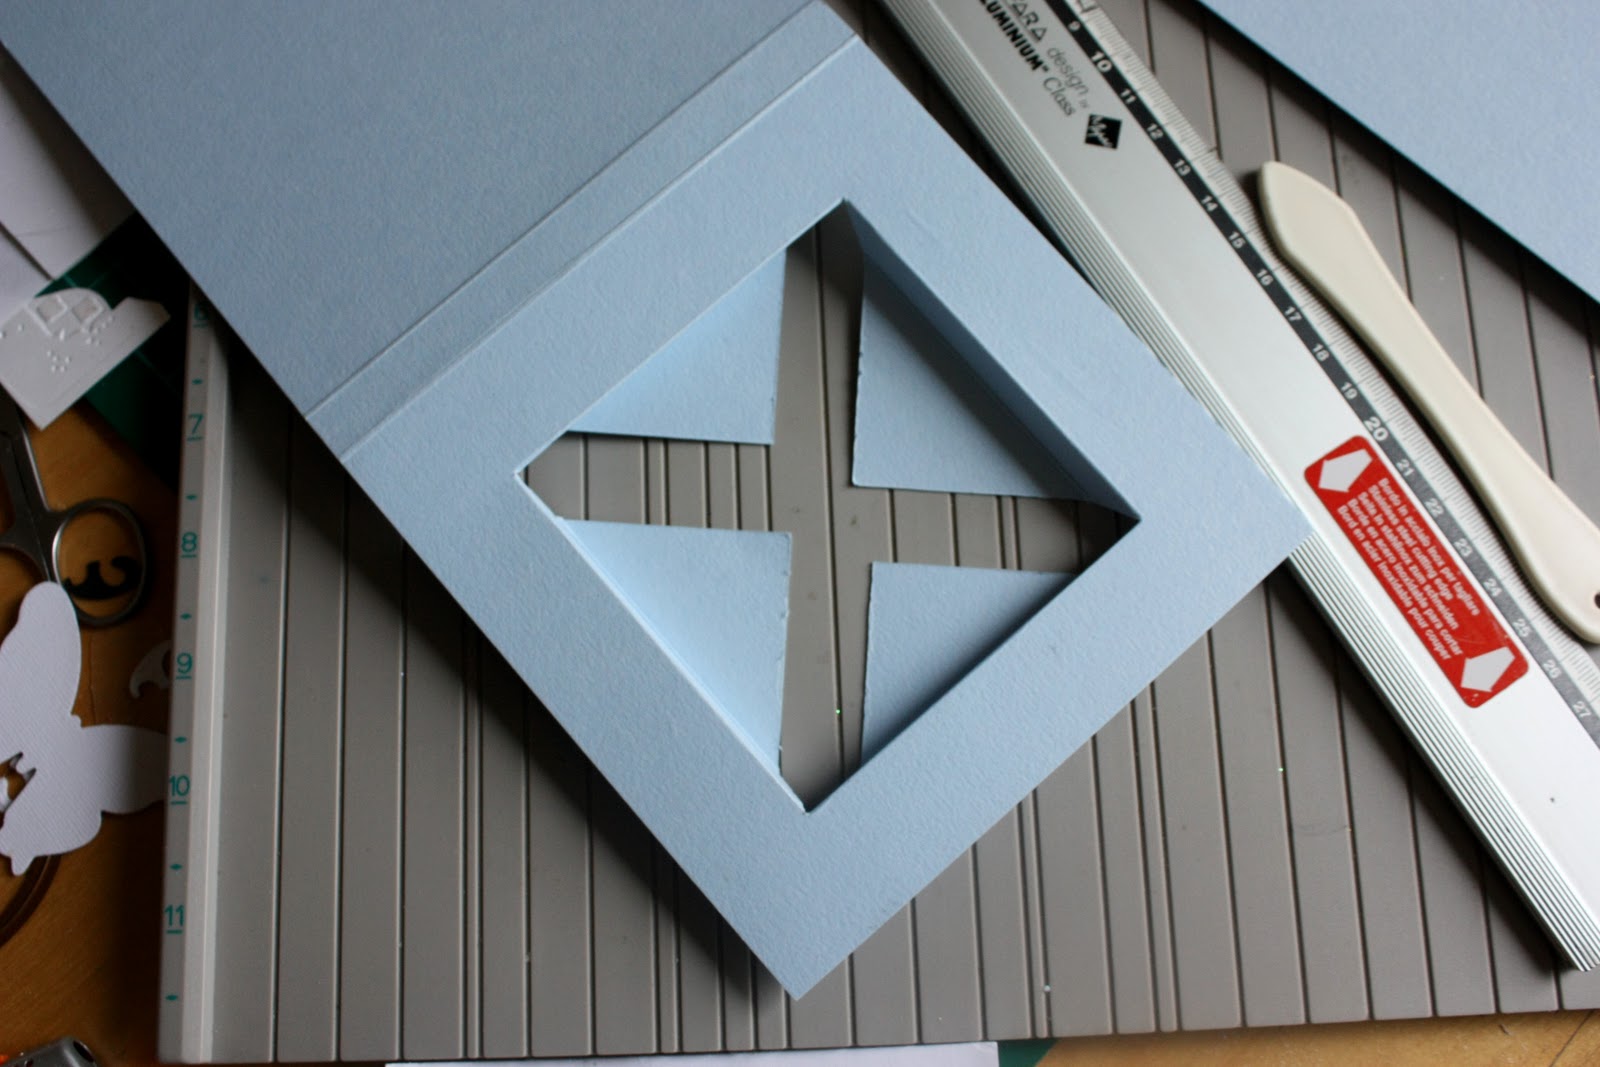
Draw lines from corner to corner (these you will cut to form the box)

Draw a second square 1/2 inch (5.2cm) in from the first square

Score along each of the four sides of the two squares.
Now cut the lines that run from corner to corner of the square.
Fold back and crease well along the edges of the outer square.

Now fold the corners back and crease along the lines of the inner square.

This is how your card should look from the front at this point.
Now cut a piece of card 31/2 inches x 31/2inches (9 x9 cm)
Glue the four triangular pieces and firmly attach the square of card to them.

(I would normally use the same colour cardstock but felt white would be better to photograph.

Now all that's left is for you to decorate your card and here is mine once I'd finished the decorating.
I had fancy papers, flowers, ribbons, pearls etc. but this card refused them all, I put a square of paper from Nitwits behind the image (Lili of the Valley's The Little Things) which is coloured with Copics and I cut out with a nesties octagon. I cut some cuttlebug fancy borders for the edges to give texture rather than colour. The leaves are from a Sizzix flowers and branch die, the flowers and larger butterflies are Crealies dies and the smaller butterflies an MS punch. The sentiment comes with the image although I've masked it and sat the two halfs side by side and placed them on a cuttlebug Fancy Tags .

I haven't decorated the inside yet, only to add a square of the patterned paper to the back of the box.

This is my first card together with the second one - I added the piece in the middle at the top to facilitate folding it to put in either a box or envelope, see photograph below.

The one with the extra fold at the top fold much neater and there is less damage of being damaged.
If you make any cards using this tutorial please let me know I would love to see your creations. If anyone has any problems or questions please don't hesitate to email me.

25 comments:
Oooh Heather this is fantastic, I will definately be giving this a go! Thanks for the fab tutorial and your cards look amazing! Hugs. KatyBoo. xxx
wuuuw so beautiful card,lovely design. thanks for tutorial
hugs pia
Hi Heather, aw thanks hun for these clear instructions, will defo have a go, but it won't be nearly as lovely as yours,
Love your image and the details, great use of the dies,
It's been very windy and raining here this weekend not very nice at all lol, hugs Liz xx
Hello Heather!
Wonderful cards. Love your new blog design.
Hugs and kisses Paula
Brilliant tutorial, Heather!
Hi Heather!
long time no visit!hope you are well, this card is extra special and sooo clever, i never have the patience to make anything as wonderful as this, i also love how you have embossed it! clever girl! love it!
hugs Di xxxxx
Fabulous tutorial Heather. Thankyou. I have sent my Love Award on, and it has been recieved with such enthusiasm, made me feel terrific, so thankyou again for the award.I know how they all feel.
Luv CHRISSYxx
this is brilliant - I love the extra bit at the top & the neatening of the corners of the box. As for the card itself - love the tone on tone textured decoration with the flowers & the butterflies - stunning with the addition of white too. Have finally managed to post the award so my thanks for that too.
Paula (PEP)
Hi Heather, fab tutorial and so gorgeous card. Love the imega and all details. Hugs;moni
a fantastic card- you coloured so well- and the card- wow- looks great!
Love image too!
Hugs
Elma
Adorable, gorgeous card Heather, great tutorial too.
luv
Debby
Hi Heather, Such an adorable shadow box card. Gorgeous image and colouring. Thanks so much for the nice clear instructions to do this.
Marion
This is fabulous Heather, love your tutorial, will give it a go, and hope it turns out as lovely.
hugs
Donna xx
Oh my word, Rica, what a fabulous thing! It's like a framed picture, something to treasure for sure. Thanks for your clear tutorial, words and pics very easy to understand. You decorated both cards beautifully too. CoB
wow heather what an amazing box ~and such a clear tutorial ~stunning and beautifully made!
vanessa xx
Hi hun
aww gorgeous card, brill tutorial thank you very much, im not so good with me ruler!! sue,x
Hi my Heather again me, just to tell you that you are the winner of my candy. :) Please send me your address. Hugs,moni
Fabby tut Heather !! I am sure Heidi and Steph would love to post this on their blog !! Can you email them ?? :-)
luv
Lols x x x
Thank you so much for the tutorial above!! can't wait to have a go its just so beautiful! Chanelle xxxx
This is gorgeous, Heather and I am so impressed with your tutorial I've had a go myself.
If you have a peek I hope you approve :-)
x
Thanks for the clear tutorial!
Hugs, Sandra
Great tutorial, will have to give this a go. Thanks.
Avril B x
wow what an awesome card and idea...you make it look easier than I would imagine it could be!! I will try and give this one a go- hopefully it will turn out ok :0) xox Tania xox
Heather you have been done a great work ...Excellent work!!you make it look easier than I would imagine it could be.......
discount card printing
custom gift cards
plastic card
Scratch Card
document, gummed or simply peel from the lemon & stick recording labels, as well as distribute them for your
how to unlock iphones 4s iphone 4s unlock
[b]iphone 4s unlock [/b] how to unlock iphones 4s
http://howto-unlockiphone4s.info
Post a Comment