Wednesday 30 September 2009

Blog Candy at last!!

BLOG CANDY NOW CLOSED

At last I've managed to get my blog candy together. This is to celebrate my new life in Germany and to thank all you lovely bloggers for your support, kindness and wonderful comments during my somewhat difficult move.
I would also like to celebrate 40,000 hits now I have reset my counter and re-added all that mysteriously disappeared last week  (fortunately as candy was coming up I checked my hits otherwise I wouldn't have a clue how many there were.
All I would like you to do is leave a link on your blog then leave  a comment. 
It is open to all and I will post anywhere. I've tried to set up Mr Linky but failed miserably so it's back to the old commenting.  You don't have to be a follower, but followers will get two entries. Could you please make two entries as a follower, sorry to be a pest but it will save me checking who has two entries, losing count and having to start again as I did last time - although it was Christmas Eve and I had been celebrating- cough cough!!
The candy will stay open until midnight GMT 30th September and the winner will
be chosen by Random Org and announced on 1st October


Excuse the lousy photograph I will try and replace it with a better one.

One set of Bo Bunny Love Shack papers which includes
(9 12"x12" double sided papers) and (10 sheet of co-ordinating Bazzill cardstock)
Four sheets of Bo Bunny Halloween papers
One Basic Grey (6"x6") Lemonade pad
One Bo Bunny Edgy chipboard Album
2 Packets  Basic Grey self adhesive half pearls
1 packet Papermania adhesive crystals
2 Crea crystal motives (1 heart, one star)
One roll of flowered ribbon
One packet of Papirloftet flowers
One new MS Cornice punch
Two Bildmarlarna images - Tossa with Rose & Tosse
There may be a few extras added if I can find anything exciting at my local craft shop.

Truly Scrumptious DT #17

This week at Truly Scrumptious we have a sketch by the 'Boss' the fabulous Sharon with the added challenge of including some doodling on your card.


Christine is offering one lucky winner the chance to choose six of her images as their prize. The DT were lucky enough to receive some images from Christine so you can see her fabulous artwork on some of their cards. Remember, you must follow the sketch AND the extra challenge to be in with a chance of winning.


We are thrilled to welcome Angela as our Guest Designer for October and November. Angela has only been blogging for 4 months but her cards are fabulous and you are in for a treat when you visit her blog.

Well I think I know which of Chris's digi-images is going to be popular - just look how many of us chose this truly delightful angel. It amazes me that one image can look so different. I think I printed her out a little large - but hey - I really wanted her to take 'center stage' as it were and she is coloured with Copics and stamped around the edges with one of Stempelglede's grunge flourish stamps. Both the green and the peach are embossed with the Textile folder and the one behind the image cut with WK Success's Parisian border punch. My doodling  (which I originally forget - another ooops!!) is on the three panels which I fastened with brads and the sentiment is Inkadinkado.


This is a close up of the angel, whose dress I covered with glimmer chalks, it doesn't show in the previous picture, but I'm not sure it does in this one either. The colours here are more true to the original which I will photograph again now we have daylight. I don't care what anyone says - daylight lamp distort the colour somewhat.


Image  -  The Sketching Stamper - Chris's digi-image
Medium - Copic markers
Cardstock - SU
Tools  -  EK Success Parisian border punch
Embellishments  -  Ribbon and brads from stash

Tuesday 29 September 2009

Create 4 Fun - A Sketch

A fabulous sketch at Create 4 Fun this week - I'm really into lots of layering at the moment. I'm not particularly good at it but it's fun to do and well 'Practice makes perfect' doesn't it?

I used my Manga Boy from Funky kits (these are great fun to colour), used Copics to colour him and stamped round the edge of the image with one of Stempelgledes grunge stamps. The papers are from Basic Grey's Indian Summer range (really love these) and the leaves I bought at the little Supermarket across the road. I wanted to stitch round the edges but the only thread I had in the right colour was too thick for my machine - no time to hand stitch so I inserted a brad in each corner and wrapped the thread around these - I think it sort of works.


Image  -  Funky Kits Manga boy
Medium  - Copic markers
Papers  -  Basic Grey Indian Summer
Tools  -  EK Success scalloped scallop border punch
Embellishments  -  Brads & thread from stash, leves Edeka supermarket

Monday 28 September 2009

House Mouse DT - Buttons

Our challenge at House Mouse this week is the lovely Pat's idea:~ Use Buttons

Check out what the other  lovely DT have come up with to help inspire you. Don't forget to check out their blogs for more details!!

and coloured it with the usual Copics. The botton paper is by K&CoOoops - not very good planning on my behalf - I used this image thinking it fit the theme of buttons better than any other I have forgetting I used it last week.  I used the image 'Wool sew for Friends', the image cut with the Maratha Stewart border punch (flourish I think) and the edges inked with distress inks. The lace and ribbon are fom Bunny Zoe's and the ribbon and thread from stash.


Image - Wool Sew for Friends
Medium - Copic Markers & Ranger Distress inks
Papers  -  K&Co
Tools  -  Martha Stewart border punch
Embellishments  -  Lace & Ribbon - Bunny Zoe's Crafts , buttons and thread from stash

Eline's Christmas toddler for Sketch Saturday

Loved the sketch at Sketch Saturday this week and thought it perfect for one of  Eline's Christmas toddlers. I coloured the image with distress inks, glitter the christmas tree and added fun flock to the bobble and rim of the hat. The papers are a download from Doreen Stolz called 'Walking in a Winter Wonderland'.  I used three flowers as bases and added three silver mirri snowflakes cut with the cuttlebug snowflake die, stamped and 
heat embossed with a glitter powder some snowflakes on the image and the sentiment is ancient (I'm doing my best to use up old stash this year).


Image - Marianne designs - Eline Pellinkov's Christmas Toddlers
Medium - Ranger distress re-inkers
Papers - Doreen Stolz - Walking in a Winter Wonderland
Tools - Cuttlebug Snowflake die
Accessories - flowers, ribbon and sentiment from stash

Sunday 27 September 2009

A Tribute to Hanna

EDITED - Hanna now has four sketches so it's one down three to go. SLOW DOWN Hanna - I can't keep up with you - you're teasing me again.

I made this card as a tribute to Hanna - my Swedish blogging friend. She designs sketches and posts them on her blog. I promised to try them, but this is the first one so far (two to go) and I have to say I followed it without any deviation (the sign of a really good sketch) and it was a sheer delight to work with.

Hanna is 13yrs old and has been chosen as a Design Team member for Magnolia which is an honour in itself and shows what a talented young lady she is. If you have never visited Hanna I urge you to do so - you will be astounded by her amazing creativity.


I used 'Tilda with Loll' as my image and coloured her with distress inks. The papers are from  kit by designs by Krista . There was a flower in this kit which I decided to use (never tried this before), I first had to alter the colour (turquoise) - I then printed out two large and two small for each flower, sprayed them with glimmer mist  (the cat as well - he always seems to appear when I'm glittering or glimmer misting lol). Once they had dried off a little I scrunched them up, waited for them to dry and assembled them . I'm pleased with the results and will certainly be doing this again.
After finished the card I hunted around and found that Magnolia Down Under wanted buttons - so a couple of little buttons anchoring the sentiment and a challenge card was 'born'.

I just hope Hanna feels I've done her sketch justice.

Saturday 26 September 2009

Sketch and Stash

Sketch and Stash have a great sketch this time which I felt this image lent itself to perfectly.  My new stash is this image, (a download from the very talented Inger Harding )  which I coloured in Copic and which I might add was a dream to colour. The green and white dp's are my neglected stash -  about 3 years old and I haven't a clue who they're by. The snowflake is cut and embossed with the Cuttlebug snowflake die using a vellum, the smaller ones in the center are cut with the EK Sucess snowflake punch and the corner also using an EK Success punch.


Image - Inger Harding 
Medium - Copic Markers
DP's - unknown
Tools  -  Cuttlebug Ice Crystal cut & emboss set  :  EK Success Corner and snowflakes punches
Embellishments  -  spacer, lace ribbon and pearl all from stash


Right I'm off shopping to Celle now - it's starting to get colder here now and I desperately need some winter clothes - I ditched a lot of mine as being old and jaded before I came.
Wish me luck - I hate shopping for clothes - now crafts - well that's a different matter - might just find myself wandering into the one and only  craft shop whilst I'm there.

Friday 25 September 2009

JM - Pink & Grey - I can do pink & grey - no problem !!

Just Magnolia have pink and grey as their colour scheme this week. Great - no problem, after all I had a trial run last week with my pink & grey card. Bet any of the DT's that visited me had a giggle, I certainly did when I saw this week's colour scheme.
Just had one small problem - papers, haven't got many pinks and greys so I had to do a little juggling round in the computer - didn't want to use the same ones as last week after all.
I had this little lady lined up for a blue outfit, but hey - there she was all stamped up so pink it had to be. TIlda is coloured with copics and I used distress inks around the edge of the image. The edge of the card is stamped with Magnolias New Year flourish stamp, the borders cut with Carla Craft Macaron punch, the leaves with the Sizzix branch and leaves die and the small flowers with the EK Success medium retro punch.  I used a flower stamp from the Stempelglede grunge collection in the center of the flowers and add pewter liquid pearls. ( Stood the card up before they had dried - now they've 'drooped' will let them dry before I remedy that). Must learn not to be so impatient. I finished the card with a small Rayher butterfly.


Image - Magnolia Dinner Tilda
Medium - Copic markers & Ranger distress re-inkers
Papers - downloaded  (better not says whose - wouldn't want to offend by my altering them)
Tools  -  Carla crafts Macaron punch  :  Sizzix leaf & branch die  :  EK Success Retro flower punch
Embellishments  :  Large grey flower - Papirloftet  :  Rayher - butterfly  :  rest from stash

Thursday 24 September 2009

Colour Create DT and Sketch Saturday

Another two weeks have sped by and it's time for Colour Create once again. This week it's the fabulous Di's to choose the colours and here they are, Hot Pink, Dusky Pink and Hot Chocolate.
The optional extras this time are 'Pearls' and 'Swirls'


Our sponsor this week is the fabulous Simon Says Stamp.
and the lovely Heidi has given us a $25 gift voucher yet again.

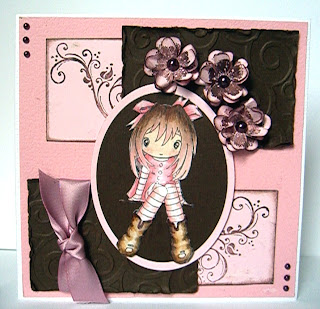
Ooooh - didn't I do well this week - I remembered both my pearls and swirls.  No chance of me forgetting these - I love my pearls and my swirls.  I decided my little Manga girl would look good in pink and brown so I stamped her up, coloured with the usual Copics, cut her out and sat her on a brown oval cut with nesties. She looks a little like she's had one too many and is 'listing' somewhat. I've actually lifted the oval and straightened her up but being lazy I couldn't persuade myself to re-photograph the card.  The brown panel are run throught the bug using the Divine swirls folder and I used Magnolia's New Year swirl/flourish stamp on the dusky pink panels. The flowers are cut with the middle sized EK Success retro flower punch, the centers stamped with a Stempleglede flourish flower, the edges inked and a Basic Grey pearl added to the centers. I followed the fabulous Sketch Saturday's sketch and will enter it into this challenge as well.


Image - Funky Kits Manga girl
Medium - Copic Markers
Tools  -  Cuttlebug & oval nesties  :  EKSuccess Retro flower punch   :
Embellishments  -  Magnolia New Year flourish stamp  :  Stempelglede grunge flower stamp  :  Basic Grey Pearls  :  ribbon from stash

Wednesday 23 September 2009

Look what I got today!!

Just look what my matey Gina sent me as a new home/welcome gift. What a suprise - I got all emotional and tearful when I opened it. There is a stunning altered box, a beautifull wall hanging decorated on both side - I've only shown the one side but can assure you the other is equally beautiful - and just look at all those gorgeous flowers (my son thinks I'm totally loopy because I prefer paper roses to real ones) I can't wait to use them and they are all so different and so gorgeous. Last but not least a fabulous little gift card  which sadly has not photographed too well.
Thank so much honey - I can't tell you how thrilled I am - you've made my day (no WEEK) !!!


Simon Says meets a Pink Elephant

I managed two challenges with this card. I followed the Pink Elephant sketch and added the stitching that Simon Says requests this week.
I used one of  Eline Pellinkov's  adorable images from Marianne designs. This is one of Eline's Christmas toddlers. Just look at that smile, it certainly brings a smile to my face!!
She is coloured in Copics and distress inks with Polar White flower soft on her fur trims,  I added a silver bead to the clapper in her bell. The two panels are embossed with the cuttlebug Snowflake folders and the smaller one cut with the Ek Success punch and the cuttlebug die. I finished it with a greeting from Cornish Heritage Farms.


Image - Marianne designs - Eline's Toddlers
Medium - Copics and Ranger distress re-inkers
Papers - Plain and Bazzill cs
Tools  -  Cuttlebug Snowflake embossing folder & snowflake die  :  EK Success snowflake punch  :  Sewing machine
Embellishments - sentiment Cornish Heritage Farms  :  lace & pearls from stash

Monday 21 September 2009

Just Magnolia - Bev's Sketch

This is following Bev's fab sketch at Just Magnolia. Tilda (kindly sent to me by my matey
Tara
) is coloured with the usual Copics,the papers are a download from Designs by Krista and the border is cut with the EK Success Parisian border punch.
I made a ribbon rose and put some white netting behind it. I had run out of this so I used the one I bought garlic in - how's that for recycling?  The leaves are cut  with the Leone Em ash branch punch and threaded with a string of pearls behind the flower with these. I finished it with a pin through which I threaded pearls and beads.


Sorry if this sounds rather rushed - it is - I keep losing my internet connection and I'm desperate to do some visiting and commenting while the 'going is good'!! Wish me luck I might just get round to visiting you all tonight.

Sunday 20 September 2009

No challenge - Just 2 Stationery boxes

My grandaughter, Hannah (see picture below - she'll kill me if she sees I put a photograph of her on my blog) has two birthdays comming up and she wanted to make cards for them. After rooting around in my computer she decided she wanted to make stationery boxes - great - no crafting or commenting for me yesterday!!  All I got to do was the boring bits.......measuring and cutting.  I must say we are both pleased with the results. The red box is for a friend Karla who's birthday is this coming week so we've actually finished the notecards inside the box, we hadn't time to make any tags for the tag holder so there is a small bar of chocolate in those and there aren't as yet any stamps in the stamp holder -( next to the notebook).
Fortunately the next birthday isn't for some weeks so we have time to make the 6 notecards for this one.
The instructions for this stationary box can be found Here and they are much easier to make than they look.


The insides


Papers & Card - Bazzill, Bo Bunny (green & brown): DCWV - Once Upon a Time - red floral
Tools  -  Scorpal  :  Heart nesties  :  Cropodile (eyelet hole in the note books)
Embellishments  -  from stash

Now Hannah has gone to a confirmation class at church so I'm heading off to do some commenting before she returns and wants to take over my computer and craft room once more (lol).

Saturday 19 September 2009

Basic Grey DT - Embossing

This weeks challenge at Basic Grey is a nice and easy one, this is one of our Lucky Draw challenges which means it can be anything at all, the challenge ideas for the Lucky Draw challenges are all put into a hat (well technically random,org hehe) and one is picked at random to be our challenge :), So the challenge picked for this week is Embossing, this can be Heat or Dry Embossing or even both if you fancy , its completely up to you :), but don't forget to use at least one item from BasicGrey if you want to be able to win our Fabulous Monthly prize, Also feel free to combine your creations with any other challenge blog that allows you to do so.

Do check out the other DT's inspirational creations.


I'm not at all happy with this one, though it does look better IRL,  it would not photograph probably for the reason I'm not happy with it - there's too much going on - it's too busy. I like the individual elements, but somehow they just don't sit together right.

I coloured my Manga girl with Copics, cut her out and 'sat' her on a Labels 4 nestie embossed with the Spots & Dots folder, in turn I sat this on white folder embossed with  Forest Branches folder.  The blue card, sat at an angle is embossed with the Swiss Dots folder. All the papers are from the gorgeous Wisteria line.....the raffia ribbon from 
Bunny Zoe's, the flower are cut with the EK Success Waterlily punch (at least I think 
that's what is called), the branches from Sizzix branch and leaves die.
The pearls and charm are from my stash.

Friday 18 September 2009

Simon Say's Recipe

Oh boy - was this fun!!
Simon Says have a recipe for us to follow this week :- 2 papers, 3 embellies and 1 motive.
I've been itching to use this adorable image by Mo (Mo's digi pencil) and this I decided was the perfect challenge for it.


The image is coloured with Copics and matted and layered onto two papers from a ancient HOTP 'Soft tint' book I've had for eternity. (Pity I didn't follow Sketch & Stash's sketch - new image, old papers - I'm brilliant at hindsight!!)  My 3 embellies are two buttons which I've threaded brads through and one spotty brad. I decided some thing was missing so I did some faux stitching around the edges with a white pen. (Hindsight again - sigh!!) The sentiment is computer generated and I have added some ribbon I bought locally, so I hope this doesn't count as a 4th embellishment.

Thursday 17 September 2009

Not my Usual

This one is for Copic Creations. The challenge this week is to "Using coloured pencils/OMS with your Copics"
I have use this technique before - but have to admit is was usually to cover up mistakes - hee-hee.
The DT team have all used Flower Fairies provided by the Sponsor janlynn corporation, Right  - me thinks,  this is the time to dig out my one and only Flower Fairy.  I did have about 5 someone gave me but I passed  them on to a lady running a craft stall to raise funds for charity. I kept one and this is it. Have to admit I found this really hard work but enjoyable at the same time.
I coloured the image with Copics and then used Derwent oil  pastels to both highlight and shade. I used Sansador to blend, and I blended and blended until not a line was visible. When I looked at it it looked flat - I'd done too much blanding, so out with the pencils again and I 'roughed ' it up - much better. I could be wrong, but I'm pretty sure this is Narcissus.


Here is a gorgeous quote I lifted from the challenge blog - taken from Wikipedia

What is a Flower Fairy?  Flower Fairies are tiny creatures (the biggest is only 20cm tall) that live in the bottom of gardens, the middle of grassy meadows, and on the edge of distant marshes. Wherever and whenever a seed sprouts, a Flower Fairy baby is born. Each Flower Fairy lives and sleeps in their chosen flower, plant or tree, and as this grows the fairy grows too. Each and every Flower Fairy is in charge of looking after their flower or plant; keeping it strong and healthy by making sure it has plenty of sunshine and water to drink, sweeping away dead leaves, and polishing flowers and stems.    

Image - Flower Fairies
Mediums - Copic Markers, Derwent oil pastels
Cardstock -  Bazzill  and from stash
Tools - EK Success Medium 'Water lily'  & small retro punch
Embellishments from stash    

Wednesday 16 September 2009

Truly Scrumptious DT

A big thank you for all your 'Indian Summer' cards for our last challenge. My turn at Truly Scrumptious to at produce a sketch for this weeks challenge - fairly easy for you  I think.
And, as usual, we have an extra challenge for you. This time we would like you to use a minimum of THREE stamps - NOT including the sentiment. Perhaps you can create a scene, use some border stamps or create your own background - as long as you use three stamps or more AND follow the sketch then your card will be eligible for the prize draw.

We are happy to welcome Design House Papercrafts as our sponsor for this challenge.
Our Design Team have made some beautiful cards which we hope will inspire you.


I received my Stempelglede Grunge Flourish Heart collection at the weekend and just couldn't resist using them. I have actually used four stamps  and have pictured them below as it's not easy to tell.


The main image is the heart, the next one is stamped around the perimeter of the heart. the third in the corners of the smaller square and finally around the corners of the larger square.


The leaves are cut with Sizzix branch & leaves die and the smaller ones with a Woodware punch. The flowers are from Papirloftet, the pearls from Wild Orchid and the little die-cut butterflies which I ran through the 'bug' using  the Textile folder are from stash as are the pearls I used for their bodies and the feather. I decided the heart receded once I'd added the flowers so I lightly coloured the centre with Copics.
One word of advice folks - feathers do not like to be sprayed with glimmer mist - 
another experiment gone wrong (lol)
I really enjoyed making this card although it took ages and I think I've decided I'm a 'Grunge' girl at heart!!

Monday 14 September 2009

House Mouse DT - Make a Choice !!

Would you believe it - a year has passed since the House Mouse and Friends challenge blog begun. To mark the occassion Emma asked that we have a Year in Review at House Mouse this week and choose the favourite challenge from the past year. 
I've only been at DT for about 8 of the twelve months, but I can't tell you how much  fun it has been commenting on all your amazing creations, not only that I've met some wonderful people and made some amazing friends. Drinks in hand please and here's to the coming year - let's all have more fun.
Another bout of 'wishy-washiness' came over me when I had to choose which of the past challenges to choose, I wanted to do so many of them. I decided eventually to do something I hadn't done for ages and chose paper piercing (week 22). That said - I wasn't happy with it so I pierced a few more holes and stitched a pattern (week 6).
So what it is now - stitched paper piercing I suppose'


My image is "Wool Sew for Friends" and coloured with Copic markers. I cut and embossed the frame with nesties labels  4 and used the same to cut the sentiment tag ........ just  juggling it around to get a complimentary shape. The leaves are cut with the Sizzix branch and leaves set, the flowers are Prima hydreangas which I scrunched up to give them a more defined shape.
I pierced the edges of the card and then used a lavender silk thread to stitch a pattern. Spacers, pearls and pearl brads are all from stash.

Sunday 13 September 2009

Create 4 Fun

One fabulous sketch at Create4Fun this week. Lots of layering which I'm really 
enjoying doing at the moment. The image (coloured with Copics) is a digital freebie 
from Inger Harding (simplyinger.blogspot.com) an amazing artist who has the most beautiful images for you to download. This is only one of them and I can't wait 
to try out some of the others.
The papers are downloaded from designs by Krista, thesnowflakes cut with the EK Success snowflake punch and the Provocraft snowflake die and the borders with the EK Success Parisian punch. The sentiment is Papermnia (I think!!).

Image - Inger Harding (http://simplyinger.blogspot.com/)
Medium - Copic markers
Papers - Download from designs by Krista
Tools - EKuccess - snowflake punch & border punch Parisian  :  Provo Craft snowflakes die
Embellishments - all from stash

Saturday 12 September 2009

Friady Sketchers & Just Magnolia

I seem to be going very pale and delicate at the moment, could be something to do with the flourescent green for Colour Create on Thursday - my eyes and senses need a rest.

This is for Just Magnolia's request for embossing added to the sketch at Friday Sketchers sketch. Tilda was kindly sent to me by the ever so lovely Tara and coloured with Copics. I painted her wings with gold H2O's and also gave her some gold streaks in her hair, not that it shows . I have three layers of embossing - the  circle is Swiss Dots, the octagon is Divine Swirls and the Square is done by using folder 3 of the Fancy folders 
and embossing the corners one at a time.
The leaves are cut with the flowers, leaves and branch set from Sizzix and the flower made using the small and medium Cherry blossom punch from Woodware.

Image- Magnolia Tilda from the Summer collection
Medium - Copic markers and H2O's iridescent gold
Papers - none
Tools - Spellbinders nestie octagons and squares  :  Provocraft embossing folder Swiss dots, Divine Swirls and Fancy corners  :  Sizzix Flowers, leaves and branch set  :  Woodware Cherry Blossom punches small & medium
Embellishments  -  Ribbon, pearls, spacer & pearl brad from stash

Friday 11 September 2009

CCC & Double Dutch challenges

A fabulous sketch at Double Dutch this week and Creative Card Crew's theme is have a Fairy Nice Day. I used this beautiful image from the Pixie collection at Charmed Cards & Crafts and coloured her with Derwent Pastels. The papers are a download called Signature Collection from Shabby Princess. I 'Fun Flocked' the clouds and used twinkling H2o's on her wings, which only show in the close up. The flower is from Papirloftet and the leaves cut with the Sizzix Branches & Leaves set. The pearls are a flat-backed chain which I've had for ever and I uses Jones Tones paper glue to attach them. The sentiment is from the Pixie set also.


Image - Charmed Cards & Crafts
Medium - Derwent pastel pencils
Papers - Shabby Pricess - Signature Collection
Tools  -  Sizzix die - Branch & Leaves set
Embellishments - Flower - Papirloftet  :  Pearl chain from stash

Right - OWN UP - Who done it???

Whose pinched my hits ??? Why have they gone from 38, 900 (roughly) to 12,000 (again roughly) what's happened, where've they gone, how do I get the back (can I get them back)???
Rest of my blog candy has arrived - at last - so I was creating a post and listing the reasons for the candy, thought I check my hits - scrolled to the bottom of the page  to check hits and thought  ooh 40,000 coming up soon that's one reason together with thanks to all my friends and followers for supporting me during my neglect whilst moving and to celebrate my move to a new country.
I'm sort of sat here stunned now, I feel cheated (bit childish I know)  but if anyone can help please let me know.
Having got that off my chest I will photograph the candy in the next day or so and post it over the weekend.

Thursday 10 September 2009

Colour Create DT - Sunglasses Out!!!

Time for another challenge at  Colour Create  where does time go???
Our Sponsor this week is Whiff of Joy and they have given us the fabulous Willow catching leaves from the new fall kit.

This week is Jo's choice Neon green and black with the option of leaves and a charm.
Check out the other DT's creations, so many this week and all gorgeous.


I ended up with two cards this time. The first one is similar to one I've done before, but couldn't think of much to do with this colour scheme. Then I came across Mo's Bat cat when I was 'rooting' through my computer and thought YES!!!
Another one I got wrong - I read leaves or charm (not and charm). OK - the first has leaves, the second  a charm. I had to go out and buy paper for this one, and unfortunately had to buy a pack - what I'm going to do with the rest of it Heaven only knows!!!


The paler stamped leaf on the background is fom K&Co which I stamped in grey, then stamped a Basic Grey flourish on top of this. All I did then was to add a selection of leaves and flowers. The large back flower is ancient, the smaller rose is the middle is from Papirloftet and I glittered both with Disco black embossing powder . The smaller leaves are cut with a Woodware punch, the fern type leaves were green so out came the trusty Copics and the rest cut with Leone Em ash branch punch.
I actually had black pearls so need for Copics this time.

I printed the cobweb directly on to printable acetate and fastened it to the front of the card with brads - hence the sheen on the photograph. Bat Cat was coloured with Copics and as I don't have a bat stamp I had to draw, colour and cut them out by hand. I used a stamp from the Stempelglede grunge collection for the edges and did some ripping and tearing at the bottom. The sentiment is computer generated and the charm from the Hobby House.

Wednesday 9 September 2009

The one that Got Away

A few folks have asked to see the one that got away ie. my Basic Grey DT card on which I forgot to add any Basic Grey products - idiot that I am.
Well here it is, not entirely finished I was going to add a sentiment at the top but have lost 'heart' at the moment.  Pleating the green at the bottom took ages and making the cord from thread at the top took me even longer - I'm out of practise obviously, won't need to do any more for a while, I ended up with miles of it  (lol).


EDITED - not getting better, put a chicken in the oven, just went to take it out, hadn't switched the oven on..............derrrrrrrrrr!!!! Wouldn't mind but I'm starving hungry.
I'm putting all this dizzy behaviour down to the slanting ceilings we have here. German houses tend to have their upstairs rooms in the roof and they all have slanting ceilings and not being used to them I keep banging my head, have been told hereabouts it should be knocking sense into not out. But I am slowly getting used to them.

See what I mean

Sukkersott

There's a fabulous challenge over at Sukkersott - they want you to mask at least three images. Great fun and one that really let me put my masking kit to work as I've hardly used it until now. Brilliant - even I can get things exactly where I want them with this. 
I stamped the WOJ log, then sat Willow on the log and finally stamped the Magnolia background.
I used the K&Co 'Sparkly Sweet' papers, haven't had the courage to use these until now, they're a little bright and I've found them difficult to use  -  I'm still not sure about the green background. The silver leaf charm is coloured with Copics.


Images - WOJ  - log and Willow  :  Magnolia - background
Medium - Copic Markers
Papers  -  K&Co Sparkly sweet
Tools  -  EK Success Retro flower punches medium & large & Corner/border punch  :  Leone Em ash branch punch
Embellishments - brads, spacers & charm from stash

Tuesday 8 September 2009

Create 4 Fun

When I saw this sketch at Create4fun I just had to do it - I just love it - 
just my type of sketch.
I had to use Tossa with Rose, she is one cutie!!  I coloured her with a mixture of Copic & Distress inks. The papers are a mixture of Designs by Krista - Baby & Classic  and Basically Neutral from the Sweet Shoppe. The sentiment is Inkadinkado Personal Impressions, the swirls BossKut leaf swirl die and the flowers from Papirloftet. The raffia ribbon from Bunny Zoe's Crafts as is the Bildmalarna stamp.


Image  - Bildmalarna Tossa with Rose
Medium  - Copic markers and Ranger Distress inks
Papers - downloads from Designs by Krist & the Sweet Shoppe
Tools  -  Spellbinders circle nesties  :  BossKut leaf flourish die
Embellishments  -  Flowers - Papirloftet  :  Rafia ribbon Bunny Zoe's Crafts  :  rest from stash

Monday 7 September 2009

It's Mousie Monday again.

This weeks challenge at House Mouse is Mary's idea:~

Song Titles/Lyrics
We also have a sponsor this week.........


My Creative Classroom is an online arts and crafts learning center. Our interactive and in-depth courses are instructor led and filled with wonderful projects and techniques to help you get the most out of your supplies. This fall MCC will be offering over 70 courses. From Cricut to Copics to mixed media to rubber stamping to scrapbooking we have something for everyone. Join us as we kick-off our fall semester on September 1st. We are excited to be spopnsoring this House Mouse Monday Challenge. One lucky winner will receive a scholorship worth $25 towards a class of your choice.


Check out what the other  lovely DT have come up with to help inspire you. Don't forget to check out their blogs for more details!!

*****************************
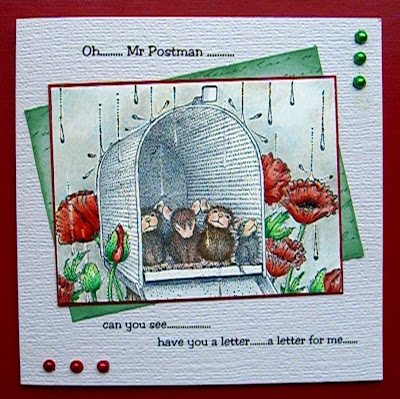
Oh what a fun challenge this was once I made up my mind which stamp and which 
song title and I'm still singing the song  "deliver the letter...the sooner the better....oh, oh....Mr Postman.......look and see......" just all think yourselves 
very lucky you can't hear me!! 
I used the image 'Special Delivery' and coloured it with Copics. The text is printed directly onto the card and the green letter (text) behing the image is some I've had for ages, it was cream so I had to do a little playing around to turn it green.  The pearls were white so I coloured them also with Copics (what wonderful things Copics are!!!) This is not a typical 'Heather' card but I do love white space, it's just not often I manage to achieve it successfully - but I have to admit I like this one.

Image - House Mouse - Special Delivery
Medium - Copic Markers
Papers - unknown
Tools - none
Embellishments - Pearls from stash

Wow - What a Service

Just how brilliant is this!!!  A quick post to let you all know what a fabulous service Nikki provides at Bunny Zoe's Crafts. I placed an order late at night on the 1st Sept (so effectively Wednesday 2nd for business purposes) and received it this morning, in Germany - just 5 days on. (I'm still waiting for one order from England placed on the 21st August). 


So folks now you know - if you want a quick efficient service with great and I might add fabulously friendly communication head over to Bunny Zoe's Crafts.
Right shall be back later with my House Mouse DT card

Sunday 6 September 2009

A Cry for Help

No card today I've made and got it ready to post forgetting to photograph it, but no matter for such a worthwhile cause.
This is a quote from Erin's  blog. Check out her blog for further details.
"Hi everyone,
I looking for some help here. For those of you who read my last post, I mentioned briefly of the condition of my neighbor. She, Paige age 13, was in a serious boating accident a few weeks ago and just had part of her arm amputated. The doctors are working to save the rest, but are unsure how much they can do. Here is a link to the article that describes it more in detail. Included in the article it mentions they've  run out of room for flowers and stuffed animals, but cards are welcome. Well my family and I really want to 
something and I thought amazing cards from all you wonderful ladies would be just what could cheer Paige up. She is one of those girls that ALWAYS wears a smile."
I 'll be offering up some BLOG CANDY for anyone who mails a card either to me to hand deliver or directly to Paige using the address from the article.

Saturday 5 September 2009

Basic Grey DT - week #3

Wow, My goodness what AMAZING creations you all had to show us for the last Challenge, We really hope that you enjoyed it and by the number of you wonderful crafters who took part, we're guessing you did  and  there will be plenty more Colour Combo Challenges to come but for now we have another one for you. 
Check out the 5 lucky winner's to go into the mpnthly draw.
Now for week 3 at Basic Grey we have a photograph for you to take inspiration from.It could be anything from patterns, shapes, colours even textures, let your imagination run wild and have fun interpreting the photo.


*************************
This is my second attempt at my DT card. I'm not sure I should tell you about my first, but perhaps I should give you all a laugh. I took the colours, green, white, pale turquoise and orange/brown/lemon (floors and flowers) and replicated the photgraph - Two panels (white curtains) and had softly coloured images on them, textured the turqoise and use some patterned green at the base of the card. Great I thought, then realisation struck - I had been so 'fired' up with inspiration - rushed in (definitely where angels fear to tread) and had comletely forgotten something - guess what!!
I hadn't use one single item of Basic Grey - what sort of a DT does that make me - I ask you!!! One for the bin and let's start again.

I took this photograph outside and the blue background must be the sky's reflection - it was actually white card.
So this is my second attempt - the Basic Grey is the patterned paper from the Romany collection and called Patchouli. I guess all I have of the photograph this time is the colours although I have the two panels which could be the curtains and I also have flowers, the bear was supposed to be the lemon/orange colours but he didn't quite make it.
My Gorjuss angel is coloured with Copic markers, cut out and mounted on a nestie circle stamped and heat embossed with a BG flourish edges stamp. The flowers are cut with the EK Sucess retro flower punches and the edges of the larger ones with a Friskars border punch. The leaves are cut with the Leone Em punch as is the stamen.
Image & stamps - Leanne Ellis Gojuss girl  :  Basic Grey Flourish edges stamps set
Medium - Copic markers
Papers - cs- Bazzill, dp - Basic Grey - Romany Patchouli
Tools - Spellbinders Nestie circles :  EK Succes Retro flower punches  :  Leone Em - leaf and stamen punch  :  Friskars border punch :  heat gun
Embellishments - Ribbon, lace, pearl & small rose from stash.
I'm still awaiting another parcel to complete my candy stash, hopefully this week as I now feel like I'm  teasing you all!! The German post lady is now becoming used to being 'stalked' and leapt upon every morning then facing looks of disappointment and disgust when she hasn't brought my parcel.
Related Posts Plugin for WordPress, Blogger...